Lorex offers various security camera systems, from standalone Wi-Fi to complete DVR/NVR security systems. Your home security is reassured by the system set up and optimally functioning. However, sometimes a camera or system fails, compromising your safety.
Are you wondering why your Lorex camera is failing and looking for a solution to get it back on its feet? You have landed in the correct spot. I’ll help you troubleshoot your camera setup system to identify and fix the problem with the Lorex camera.
Why Are My Lorex Cameras Not Working?
Lorex camera won’t work due to a power or network disconnection. Ensure that your camera is powered and connected to a working network. Power cycling your network and Lorex devices should refresh and reinitialize the connection. This should solve temporal functional system errors or drop-in network issues.
Here are common reasons why your Lorex camera is failing;
- Power or network disconnection
- Weak network signal strength insufficient to support the camera activities
- NVR maximum power consumption issues
- Faulty network ports or ethernet cables
- Incorrect camera settings affecting the performance
- Corrupt firmware files
Lorex offers direct connect, DVR, and NVR security cameras. The exact response to the issue depends on your camera system.
I’ll cover both scenarios; you can follow the troubleshooting steps for your Lorex system.
However, irrespective of the Lorex camera system, the camera must be powered and connected to your home network. If the camera is displayed as offline on the app, here’s how to get it back online.
Troubleshooting Lorex Wi-Fi Camera Not Working – Standalone Cameras
Lorex cameras use a LED indicator to communicate their status. Primarily, you want to see a solid green light on your Lorex camera – Any other or lack of states a connection problem.
First, confirm that your camera is connected by observing the LED indicator.
Power-Related Issues
You won’t get any performance from your Lorex camera without a power connection. Check all power connections and cables to ensure they are securely connected.
Verify that the power outlet hooked to the camera works. Perform a reset or power cycle of the camera by disconnecting and reconnecting the power supply after a few moments.
For battery powered unit, confirm that the battery has a healthy capacity. You could have missed a low-battery notification on the Lorex app.
Check Your Network Connection
Lorex has different network connection mechanisms. You need sufficient signal strength for a Wi-Fi connection to support the camera operation.
Check the network connection and ensure the camera is within range of the Wi-Fi router. Network interferences or obstructions weaken the connection, thus, affecting performance.
Restart your router or modem to refresh the network connection. Verify the camera’s Wi-Fi settings, ensuring the correct network credentials are entered.
Remember to check your camera’s network compatibility. Lorex has cameras compatible with 2.4 and 5 GHz networks, while others only connect to 2.4 GHz.
Smart switching between the bands could disconnect the camera and render it offline.
Again, don’t confuse the ethernet port on some Lorex cameras with PoE capability. Confirm on the camera specs that it supports power over ethernet. I tried to power my Lorex 2K outdoor pan and tilt model via the ethernet port and couldn’t get it to work; it doesn’t support PoE.
Double Check Your Detection Settings
The Lorex app provides different camera settings to customize your camera to your preferences.
An incorrect setting or a disabled feature could have you thinking your camera isn’t working. Therefore, confirm your camera settings on the Lorex app.
Open the app > Select the camera > Tap the three dots icon > Check your camera settings (Motion detection, Person detection, Sensitivity, and Activity Zones)
With the motion detection toggle disabled, your camera won’t be triggered by events in its field of view.
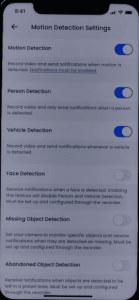
Ensure the motion detection is enabled and the sensitivity level is set to 4 – 6. Lorex offers a sensitivity scale of 1 to 6. Increasing or decreasing the sensitivity affects how quickly and frequently the camera picks up motion.
Power Cycle Your Devices
Power cycling is a process that involves restarting a device and resetting its network connection.
You can reboot your network router and all Lorex devices to refresh the connection. This restart helps to eliminate temporary configuration errors and resolves any IP conflicts within the network.
To perform a power cycle, disconnect the router from its power source and leave it unplugged for approximately one minute. Afterward, plug the router back in, allowing it to boot up and reestablish its connections.
Confirm that you have an active Wi-Fi signal by using your phone or another device to access the internet.
It’s important to note that Lorex cameras require a solid signal to sync correctly with the cloud servers.
Once your network is stable, power cycle the Lorex camera: unplug the USB from the adapter and wait for around 20 to 30 seconds before plugging it back in.
Give the camera one to two minutes to reconnect. During this time, observe the status LED; a solid green light indicates that the camera is online and should be functioning correctly.
Try accessing the Live stream from the Lorex app.
Reset The Camera and Reconnect
If nothing gives, your last resort should be to factory reset the camera and reconnect anew. Factory resetting clears corrupt configuration files and restores the default firmware.
Once reconnected, upgrade the camera to the latest firmware.
To factory reset your camera;
- Find the reset button on your camera model
- Press and hold the reset button for 10 – 15 seconds. You should get a chime sound.
- The camera resets and enters pairing mode with a flashing GREEN light.
The reset button location depends on your Lorex Wi-Fi camera model. Here is where to find the reset button on Lorex Wi-Fi cameras.
After resetting, pair the camera to your home network via the Lorex app. A successful reconnection and live view access means your camera now works.
Troubleshooting Lorex DVR/NVR Camera Systems
Lorex DVR or NVR system is a popular choice for its various options. It offers customizable features for 24/7 or event-based recording.
The cameras can be wired or wirelessly connected to the NVR, DVR recorder, or PoE switch. Once connected, you can access your camera from your monitor or the Lorex app.
As with the Wi-Fi models, the system cameras must be powered and connected to your home network for optimal performance.
Therefore, confirm your cameras’ power and network connection state when faced with functionality issues. There could be some damaged cables or ports affecting the connection.
If your camera can’t power on, try these troubleshooting solutions to identify and fix the camera power issue.
To get your Lorex camera back working, try these troubleshooting solutions;
- Ensure the camera is well-powered and connected to your network (via ethernet or Wi-Fi connection)
- Your camera won’t work when the recorder exceeds the PoE budget. Check this Lorex support page for a complete guide on calculating your recorder budget.
- Double-check your DVR/NVR recording and motion detection settings and ensure everything sits right.
- Inspect your connection cables for damages or loose connections.
- Update your camera system and app to the latest software version for bug fixes
Reboot the Lorex system and network devices to refresh and reinitialize your cameras. Once the cameras boot and hook to your network, refresh the app and try accessing them.
Finally, if nothing works, factory reset the camera and reconnect it to the DVR/NVR setup. If the whole system is malfunctioning, restore the default settings under the recorder settings.
Final Thoughts
Lorex cameras are valuable tools for enhancing security, and ensuring their proper function is essential in maintaining peace of mind and protecting your property.
Most functionality problems on Lorex cameras stem from network or power connection issues. A solid green LED on your camera confirms the connection.
Barring firmware or server outage problems, you should get some form of functionality from a connected camera. Once you do, you can customize it further to suit your needs.