Blink indoor and outdoor cameras are feature-rich with several customizable settings options. You can customize your security system based on your preferences, thus, getting the best out of your Blink camera security system.
So, to get the best from your system, what settings must you keep in mind?
In this article, I’ll walk you through the different settings to maximize your security system functionality.
What Are the Best Settings for Blink Outdoor Cameras?
To get the best out of your Blink outdoor camera, ensure it’s well-positioned with a constant supply of a solid internet connection. Next, configure the motion detection, level of sensitivity, retrigger time, temperature alerts, and activity zone settings to achieve your preferred setup.
Before getting into the details of the settings, your camera must be set up and linked to your Blink account.
Ensure that you have appropriately named the camera. Give the camera a unique and descriptive name you can easily remember and identify.
Remember that the name is also used to link and bring up the display when linked to Alexa or Google Assistant.
I have a complete guide on setting up Blink cameras. Check it out for a comprehensive guide on the installation process.
As mentioned, there are different customizable settings on a Blink camera. Always look forward to testing different settings and observing how things play out.
All settings are camera-based; ensure that you customize each camera separately. However, you can uniformly arm or disarm cameras from the home screen option.
Name And Update the Camera Thumbnail
As mentioned, you need a unique name for each camera on your Blink security system. Without editing, your Blink camera usually has a weird-looking name.
To rename your camera;
- Navigate to the camera settings by tapping the “three blue lines with dots” next to the “running guy” icon
- Name is the first option under general settings
- Give the camera a name; say “blink outdoor” or your preferred name
- Hit the top right save button.
On the Home screen, each camera has the video (left) and camera (right) icons on the bottom.
The video icon loads up the Live view while the camera icon updates the camera thumbnail.
To refresh or update the thumbnail picture, tap the camera icon. This picks and saves the live view snapshot as the camera’s display picture.
Device Monitoring Settings
This settings option monitors the status of your Blink camera. It has battery and temperature options.
The battery status indicates the current health of the installed battery. You should see an “OK” state here, meaning your battery is fine.
The temperature option indicates the camera’s current temperature. Tap it to edit the temperature options.
Primary blink outdoor cameras can operate between -4°F to 113°F while indoor and Mini cams operate between 32°F to 95°F.
Enable the “Enable Temperature Alert” toggle to receive alerts when your camera temperature falls below or above the set values.
The last option is to calibrate your camera’s temperature if you wish.
Don’t forget to save any changes by hitting the Save button.
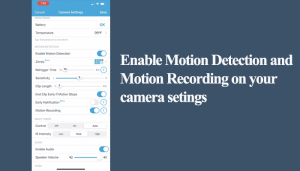
Enable Motion Detection
The system must be armed and motion detection enabled for the Blink camera to record clips.
You can enable motion detection from the home screen or the camera settings page.
Once set up, the “running man” icon is a shortcut to quickly enable and disable motion detection without loading the settings page. When enabled, the icon appears blue and gray when motion detection is disabled.
To manually enable motion detection;
- Open the Blink app
- Load up the camera settings page by taping the “three dotted lines” icon
- Toggle the motion detection on
Under motion detection, several settings should be considered based on your preferences. This includes;
Activity Zones
This allows you to specify which areas of the camera’s field of view you want to monitor for motion.
You can draw up to three rectangular zones on the camera’s live view screen, and the camera will only alert you if motion is detected within those zones.
For example, if you have a Blink camera mounted outside your front door, draw a motion zone that covers only the porch area rather than the entire yard.
This will help reduce false alarms and ensure you only receive notifications when someone approaches your front door.
To create your activity zone > navigate to camera settings > tap Zones > Select Activity zone > Grey out the unwanted area > and tap Done to save your changes.
Privacy Zones
These zones allow you to select specific areas within the camera’s view that you don’t want to trigger motion detection.
You can completely block off motion detection from the select zones.
For example, if your camera is facing a busy street, you can create a privacy zone to avoid alerts from passing cars.
To create a privacy zone, follow these steps:
- Select the camera you want to adjust > tap the settings toggle
- Select “Zones” and then Privacy Zones.
- Add a zone by graying out the unwanted areas
- Click “done” to apply the changes
Motion detection sensitivity
This determines how easily the camera will detect motion and send you notifications.
You can adjust the sensitivity level from low to high, depending on your preferences and the environment in which the camera is placed.
For standard operations, set the sensitivity from 5 – 7 on the bar.
Recording Behavior
Recording Retrigger time – This is how long your camera takes to start recording again after one clip ends.
To make sure you get all the activities, keep this time down. I prefer setting it to 10 seconds, but you can choose any value up to 60 seconds.
Clip Length – The length of recorded clips when motion is detected. You can set it from 5 to 60 seconds.
Anything between 20 – 30 seconds is sufficient. Remember, the stored clips eat up your storage.
While setting your clip length, enable the “End Clip Early If Motion Stops” toggle.
This means the clip ends when the camera no longer detects motion. Other than getting a complete recording of your set length.
Finally, keep the Motion Recording option enabled. Otherwise, you only receive notifications.
Night Vision Settings
Here you set how you want your system to switch to night vision and select the IR intensity.
You have three options, Off, On, and Auto, to control the night vision. The Auto option works fine as the system automatically switches.
Blink cameras use a passive infrared (PIR) sensor to detect motion. This sensor is designed to detect changes in temperature in its field of view.
You can set the IR intensity with three options Low, Med, and High. The Medium option is suitable for standard operations.
Video Settings
This dictates the streaming quality of your Blink camera. If you are like me and want the best quality available, set it to the “Best” toggle.
The options imply different video qualities
- Saver – 480p resolution
- Standard – 720p resolution
- Best – 1080p resolution
The high the resolution, the more the power and bandwidth requirements. If you set your camera to “Best,” ensure it has solid internet access.
Other Settings
Enable the “Photo Capture” toggle for hourly snapshots.
The status LED dictates whether to have a light when recording or not. You can switch between “Off” and “Recording,” depending on your preferences.
Blink System Settings
There are other settings options available on the system level. This allows you to manage your cameras, sync module, notifications, scheduling, etc.
To manage your system settings, tap the setting icon on the bottom navigation menu to load up the settings > select your blink system under the system settings.
Here you can do the following;
- Sort the appearance of your camera on the home screen
- Enable scheduling – If you only want to receive motion alerts during certain times of the day, you can also schedule your Blink camera to detect motion only during those times.
- Select and set your Time zone
- Confirm that your sync module has an active connection – linked to the cloud with a green line
- Delete the system – if you wish to discard it and set it up afresh. This deletes the module together with the associated cameras.
Frequently Asked Questions
How Can I Improve My Blink Motion Detection?
To improve your Blink camera motion detection, ensure the camera is well located with a clear field of view. Again, adjust the camera sensitivity and set it to level 6 or 7 under settings. Increasing the sensitivity level increases the number of alerts and clips recorded.
Try these to improve your motion detection;
- Move your camera to a location with fewer obstructions and less interference
- Turn off or move other wireless devices and electrical devices in the area
- Adjust the sensitivity settings on your Blink camera to reduce false alarms and increase motion detection
What Is the Best Position for Blink Outdoor Camera?
For optimal motion detection, it’s recommended that you place your camera within 5 to 20 feet (about 1.5 to 6m) of the area you want to monitor. This range allows your camera to detect motion effectively while minimizing false alarms. Additionally, ensure that your camera is installed in an appropriate location with a clear view of the area you want to monitor.
Avoid placing your camera where it may be obstructed by objects such as trees, bushes, or walls.