Resetting smart devices comes in handy when troubleshooting functional or connection problems. It’s always a tool to have in your box. So, you ran into a problem or looking to freshen things up by resetting your Tapo camera?
Resetting the Tapo camera is straightforward; press and hold the reset button for 5 – 10 seconds, and the status LED blinks red. The camera resets and restarts in about 3 minutes. Once reset, the camera enters pairing mode, ready to pair via the Tapo app.
In this post, I’ll walk you through the reset process and highlight situations when resetting is necessary.
How To Reset My Tapo Security Camera?
Reset your Tapo camera by pressing the reset button for 5 – 10 seconds. Before resetting, ensure that your camera is connected to a working power outlet or well-charged for battery-powered models. Once the status LED blinks red, release the button.
Resetting the camera clears all the configurations and settings on the app. This includes all your virtual assistant integrations.
After resetting, you must reconnect and add the camera to the integrations.
Therefore, before resetting, be sure you have explored all other available options. Power cycling is one handy tip when troubleshooting your camera.
To power cycle;
- Unplug the camera from the power outlet
- Wait for a minute or two
- Reconnect it to power and let it initialize
- Test if the camera work as intended.
Power cycling refreshes and reinitializes the camera clearing out any temporal configuration errors or conflicting files. It’s a nice tip to try before factory resetting the camera.
If power cycling doesn’t move the needle, you can factory reset it.
Tapo recommends manually resetting the camera or removing it from the Tapo app. I prefer removing it from the app and then manually resetting it. This guarantees a full reset.
Deleting Tapo Camera from App
There are two ways to remove a camera from the Tapo;
Long pressing the camera on the home screen;
- On the home screen, identify the camera you want to delete
- Long press the camera model
- a menu appears on the bottom with share, unfavorite, Relocate, and Remove options
- Hit the “Remove” to delete the camera from the app
Navigating through the settings;
Alternatively, you can find your way by loading up the camera settings page – the old common way. Here is how to do it;
- Launch the Tapo app
- Tap Camera Preview > Manage to load up the live view page
- Tap the settings Gear icon to load camera settings
- Scroll to the bottom > hit the “Remove Camera” button
- Confirm your intention
Removing the camera disassociates the camera from your account and sets it up nicely for factory resetting.
As stated earlier, reset the camera by pressing the reset button for 5 – 10 seconds until the LED blinks red.
To successfully reset the camera, ensure a constant power supply during the reset process.
Once the camera powers on and enters pairing mode, you can reconnect through the Tapo app.
Where Is the Reset Button on Tapo Camera?
There are various models of Tapo cameras in the market, each with different specifications and designs.
The reset button location varies from one model to another. Here is where to find it in different models;
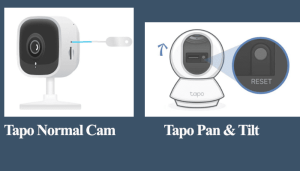
For Pan & Tilt Tapo cameras – Tilt the camera lens manually or via the app to access the reset button. The reset button is beside the microSD card slot.
For Tapo Security cameras – The reset button is on the camera’s side above the SD card slot. Use the thin pin or paperclip to press and hold it for 5 – 10 seconds.
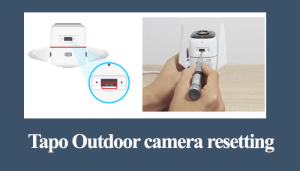
Tapo Outdoor security camera – Remove the back cover by loosening the screws. After removing the cover, press and hold the reset button, as illustrated in the picture below.
When To Reset Your Smart Camera
Sometimes it’s pretty necessary to reset your camera, and there are tell-tale signs that it’s malfunctioning and needs a reset. Here are some activities that necessitate bulb resetting;
- The Camera is unresponsive – Sometimes, these Tapo cameras develop response issues, or the live feed becomes inaccessible. Resetting the camera refreshes it and clears any conflicting configuration or firmware files.
- When changing the Wi-Fi network – To connect a Tapo camera to a new Wi-Fi network, removing the camera from the Tapo app, resetting it, and connecting it to the new Wi-Fi is the effective way. You won’t experience any troubles with this method.
- If you intend to gift them to a friend – If you want to hand over a Tapo device to new ownership, remove it from your routines and connected accounts. Resetting it ensures the new owner doesn’t experience trouble setting up the device in their home. They avoid the typical “Device is associated with another account” error.
Final Thoughts
Resetting smart devices comes in handy when troubleshooting connection and functionality problems.
Factory resetting wipes the device clean, and you start afresh with the factory-release firmware and configurations. This allows you to remove corrupt firmware files affecting the performance.
After resetting, reconnect your Tapo camera and upgrade to the latest firmware to continue enjoying the product.