The inability to review what happened in your camera’s field of view beats the security essence of your device – such a case as when your Blink camera is not recording. This lowers the security rating of your system and could have you questioning its importance.
The Blink camera won’t record if unattached to an active storage plan. I’ll walk you through the troubleshooting steps to get your Blink system or camera recording.
Why Is My Blink Camera Not Recording?
Your Blink camera isn’t recording because it’s disconnected from your network, improper device settings, or your system isn’t armed. Ensure the camera is armed and motion detection and recording enabled to get clips from your camera.
Here are common reasons why your camera isn’t recording;
- The camera is disconnected from your network and offline
- Poor network signal insufficient to support the camera’s operations
- Improper camera settings – motion detection, recording, sensitivity level, etc.
- The Blink system is disarmed
- No active storage plan is attached – local or cloud storage
- Sync module issues for local storage
- Power supply issue – low battery or incorrect wiring
That said, Blink offers local and cloud storage. To record and store your Blink camera clips locally, you need a Sync Module 2. With a subscription, local storage plays a backup role.
After setting and installing, Blink offers a one-month free trial to Blink cloud subscription. Giving you a taste of their pay-to-play services and features. When your trial period lapse, your camera won’t record unless your switch to local storage.
Out of the Box and without a cloud subscription or trial, you get these features; Live streaming via the app, Motion detection alerts, and Two-way audio. For additional features, you must be a Blink subscriber or turn to local storage to get clips recorded.
If you have local storage and your camera isn’t recording, I have a curated article on local storage not recording.
Fixing Blink Camera Not Recording
Getting your camera to record provides a playback option to monitor what transpired in the camera’s view.
The other day I saw someone complaining that their smart camera missed some recordings only to wake up to a tire-less car. Damn! That must have been heart wrecking. I guess it was a case of someone jamming their network.
Back to our problem, how do you get your blink camera to record? Follow these troubleshooting solutions to confirm your setup is on point;
Confirm Your Camera Is Online
This is a no-brainer; the Blink camera must be online and in sync with the cloud servers to detect and record motion events.
The Blink app displays the camera connection state on the device settings tab. Where it shows its connection to Wi-Fi and sync module. Barring Blink Mini, all other Blink cameras require a sync module to set up.
Blink recommends at least two Wi-Fi bars on the “camera to Wi-Fi connection” and “camera to sync module” statuses. If you have one bar, it could be a case of poor network connection preventing your camera from recording.
The sync module must be online, indicated by solid GREEN and BLUE LED lights. Alternatively, check the app to confirm the cloud connection.
Power cycling your devices (the camera, Sync Module, and Network router) should refresh and reinitialize the network, thus, boosting the signal strength.
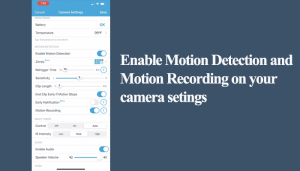
Double-Check Your Camera Settings
For your camera to record, the blink system must be armed and motion detection and recording enabled on each camera.
An armed blink system is when the system is actively monitoring; an event triggers the camera to detect motion, start recording, and send a notification alert.
On the other hand, when the system is disarmed, all the security features are disabled – any motion doesn’t trigger the devices.
A gray running man icon indicates the camera is disarmed, while a blue one means the camera is armed.
On the home screen on the bottom right, you’ll find the “Armed/Disarmed” toggle buttons. You can switch from one state to another accordingly.
Apart from arming and disarming your camera or system, individual camera settings affect the camera’s functionality.
Confirm that your camera settings sit right. Tap the three dotted lines to load up your camera settings page and confirm the following;
- Motion Detection – Ensure the motion detection toggle is enabled on the camera
- Zones – Activity and Private zones define the area of focus on the camera field of view.
- Motion Sensitivity – The scale defines how easily motion events trigger your camera. I prefer settings my Blink outdoor cam to 7 on the sensitivity bar.
- Motion Recording – Ensure your camera motion recording is enabled.
Down the tab, you have night vision and video quality that you can set based on your preferences. Check out this article on blink camera settings for a complete guide.
What’s Your Storage Option?
As mentioned earlier, you can’t record motion clips without an active storage plan. Blink offers two storage methods, local storage with a Sync module 2 or cloud storage with a Blink subscription plan.
Combining both plans is also a viable option. However, the local storage only acts as a backup, and the clips are only viewable on a PC.
So, have you attached your system to an active storage plan? Without one, the Blink security system only offers motion alerts and live view.
You must turn to the above storage options at the end of your Blink free trial period or proceed with none. Unfortunately, blink hides most of its features behind the cloud subscription plans – you got to pay to play.
If you have an active subscription, confirm it’s attached to the suitable cameras on the Blink app.
For local storage, Open the Blink app > select the sync module > Tap Local storage > Check the status, and check your remaining capacity.
With local storage, you can only delete one clip at a time. If you are running low on storage, safely eject the thumb drive from the module, connect to a PC, and mass delete clips to free up the storage.
Remove And Reconnect the Sync Module
The last resort to the recording storage is an issue with the Sync Module.
The sync module functionality could be problematic if all other factors (attached storage, armed system, enabled motion detection and recording, and network connection) are on point.
Removing the sync module from the app is a sure way to refresh the blink system and its communication with the cloud servers.
To remove the Sync module from the app
- Select the sync module on the Blink app to load up the settings page
- Hit the “Delete Sync Module” button and confirm your option by tapping OK.
- Verify the serial number. Enter or scan the serial number on the sync module’s back to verify ownership. Tap Continue.
- Tap Delete on the pop-up window to finalize your action.
The connected cameras aren’t deleted but won’t be accessible on the app. The sync module must be reconfigured to return the cameras to action.
Reconnect the sync module to the Wi-Fi network, arm the system, and test if the camera records.
If you can get a live view on your camera, you should be able to record after meeting all the requirements.
Alternatively, you can factory reset the Sync module and start your setup installation afresh.
How Do I Get My Blink Camera to Record Motion?
You must arm your system and enable motion detection and recording under the camera settings to get your Blink camera to record. Additionally, the camera requires an active internet connection to record and sync with the Blink cloud servers.
Follow this checklist to get your Blink camera recording;
- Confirm that the camera is online on the Blink app and that you can access the live feed.
- If you have a Sync module, it should also be online – solid blue and green status lights
- Arm your blink system or the individual camera – indicated by a BLUE running man icon on each camera.
- Customize your camera settings – enable motion detection and motion recording, increase or decrease the sensitivity level, set activity zones, etc.